Showing posts with label crafts. Show all posts

Sunday, November 16, 2014

DIY: Billy Truffula Button

Hello there all,

I had some Townshend's Kombucha bottles that I was enamored with, but they sat on my buffet so lonely lacking company. During the Halloween season, they were adorned with black roses, but they were sitting there begging for some love. Being inspired by my love for Truffula Trees and Billy Buttons, I came across this tutorial on how to make "poof balls". It was a great jumping off point, but there are some things that I adjusted that helped me. It might be a better system for you, too.

Here's what you'll need:


  • yarn 
  • stick
  • scissors
  • hand
How to rock this:


1.) Place a portion of the yarn in between two of your fingers and tighten your grip around this piece before you start wrapping the yarn around your fingers.


2.) Wrap the yarn around your fingers. I used 4 fingers because I wanted bigger pom poms, but you can decrease the amount of fingers to match the desired size.


3.) Keep wrapping and wrapping around your finger. The more yarn that you wrap, the bigger and fluffier your pom pom will be.


4.) When you are done wrapping the yarn around your fingers, cut the wrapped yarn. You will need to cut a separate piece of yarn that is about 5 inches long. You will use this separate piece to tie around the middle of the yarn that has been wrapped around your fingers. You will probably need to loosen up your fingers to do this. When you tie all of the yarn together, the knot should be tight. I used a double knot for extra precaution, and it should make an hour glass shape.


5.) Next, you will cut the loops that are made. These are the loops that are found on the top and bottom of your hourglass figure. You will cut the loops in half, so they go from having a loop to being separate strands of yarn.


6.) When you have cut all the loops, you can attach it to a stick. I did this by putting the stick through the middle of the pom pom. You can find this by finding the yarn that you tied around the whole thing earlier, and you make sure that the stick goes through the center of that tied string.


7.) Place them in an epic vessel. I love these bottles because they fit into the mentality of reusing a grocery item like I talked about in this article.

Until next time, remember the words of the Lorax: "UNLESS someone like you cares a whole awful lot, nothing is going to get better. It's not."

-Autumn

Sunday, November 2, 2014

DIY: Felt Sign

Hello there all,

After the many hours of perusing Pinterest that I have invested, I always come back inspired for new things to do. One thing that I love to pin are beautiful quotes or sayings that I would like up in my house as art. Recently, I came across this and knew that I wanted to create a sign. With the ridiculous amounts of felt that I have laying about, it only made sense to make the sign with felt.


What you'll need:


  • two varying colors of felt: one for text and one for the background
  • fabric glue/tacky glue
  • hot glue and hot glue gun
  • stick
  • string
  • pen

Let's do this:


1. Decide on the quote that you like. When you have it decided, you will need to cut this out of your text felt. You can do this a couple of different ways: print off the text that you like, cut it out and use those letters as stencils; you can free hand what you want the text to look like; or you can use a projector to project the text onto the felt (this is what I did). You will also want to cut a thin slice of felt that is slightly longer that the width of your background felt.


2.) Take your background felt and fold two corners in until they meet. You will cut off these two corners. You should be cutting off the two triangles that are made while folding the corners in. Your leftover background felt will leave a point.


3.)  Next you will mark where your plan to put the stick on the back of the felt. In order to plan this, you will need to look towards the top and fold the fabric over the top of the stick with room for gluing it down.  This will show where you will lay the stick, mark the bottom of where the stick lay.


4.) Cut little slits along the line that you just drew. These should be every so often and be as long as the width of the felt strip that you cut from the text felt. It will vary in the look you want, but I did one slit about every 1/2 inch.


5.) Weave the strip of text felt through the slits that you cut through the background felt.


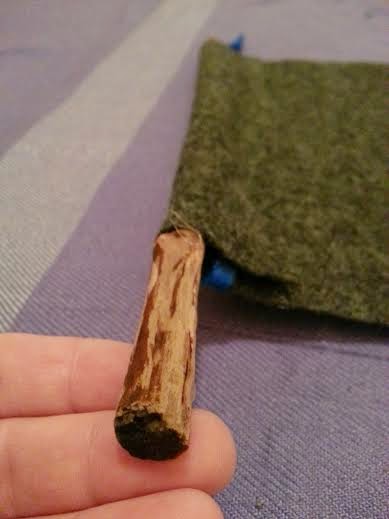
6.) Place the stick against the line that you drew on the back of the background felt and fold the background felt on top of the stick. Hot glue the stick and fabric together to encapsulate the stick into the fabric.


7.) Using the Tacky Glue, glue the text onto the front of the piece of background felt.If you want the line to be straight, you can use a ruler, but I didn't use one :).


8.) Wrap the string around one side of the stick making sure that it is secure. Take the same string and wrap it around the other side of the stick. You can use some hot glue to keep it from unraveling. Make sure to leave some room, so you can hang it later. However, you should wait a short while before hanging it so all the glue will dry.


9.) Marvel in how awesome you are.


Craft Flaw: I messed up when I originally made this, and I wanted to share what I did to make it better. When I originally wrapped the string around the stick, you could see the hot glue, and it was a hot mess. So, I just went through and re-wrapped each side with the string. This time, I just tied the string to itself instead of using hot glue, and it is staying pretty well.

Now, it is time for you to go make one!

-Autumn


Sunday, October 26, 2014

Listy Listiness: Birthday

Hello there all,

My birthday is coming up next Monday (November 3rd), and here are just a couple of things that I've had my eyes on recently.


1.) Khaled Hosseini's book And The Mountains Echoed. I have read The Kite Runner and A Thousand Splendid Suns which were both beautiful. Now, it is time to read another Hosseini book.

2.) alphabet stamp set which can be used in wood, metal, etc. So, I can make some projects that I've been dreaming of like this and this.

3.) A rotary cutter for sewing adventures.


4.) This old tv wet bar. I would also be okay with an old tv turned into an aquarium like here. It makes me think of the old tv show "Caroline in the City." Anybody else remember that aquarium?

5.) These leggings


6.) This porcelain pen to create neat-o things like this.

7.) This pressed plant print from The Dainty Squid. It also inspires me to want to press every plant. ever.


Happy almost birthday to me!

-Autumn

Sunday, October 19, 2014

DIY: felt bows

Hello there all,

Whenever I draw a cartoony-sillsy version of myself, I draw myself with a bow. For example, this picture of me as a cuttlefish.


 However, I, personally, had no bows! What a travesty! Therefore, I went on a binge and made myself some felt bow barrettes. When I wore them, I got multiple compliments, so I thought: why not share the how to with other people  while making a batch of bows for some of my loverly residents at work.

Here is where I originally got the idea. However, I modified it slightly by using hot glue and making them bigger for my needs.


What you'll need:
  • felt in colors of choice
  • barrette clip-y doodads
  • hot glue gun and glue
  • stencils from the template found here (you can easily make your bows bigger/smaller than this) The ones that I made are slightly bigger). I traced the template instead of printing them because we don't have a printer.
  • scissors
  • pen/marker/chalk
  • Hands that hot glue won't destroy
Let's make some bows:


Trace the stencils onto the felt then cut the pieces out.


With the longest piece (the piece of that kind of looks like a mustache), gently fold one side over into the middle and glue it down to the middle. You should have a loop on one side after this step.


Fold the other edge over and hot glue that section down into the middle. Your bow should already be taking form, and you should now have two loops.


Hot glue the first shape that has two loops onto the smaller shape that looks like two attached Pac-man (seen above). You should have the creases from the first made shape facing down and glue that part to the Pac-men.


With your smallest piece left, wrap this around the two other pieces and hot glue it down to the rest of the bow. I think it is best to do it in the middle of the bow and underneath where it wraps under.


Hot glue your finished bow onto a barrette.


You could easily modify this for several things: bowtie, beanies, socks, headbands, sweaters, ornaments, magnets, etc. Everything can have a bow and just be a smidge cuter.

Good luck with your bow making and may everything you own be bow-tiful.

-Autumn