After the many hours of perusing Pinterest that I have invested, I always come back inspired for new things to do. One thing that I love to pin are beautiful quotes or sayings that I would like up in my house as art. Recently, I came across this and knew that I wanted to create a sign. With the ridiculous amounts of felt that I have laying about, it only made sense to make the sign with felt.

What you'll need:

- two varying colors of felt: one for text and one for the background
- fabric glue/tacky glue
- hot glue and hot glue gun
- stick
- string
- pen
Let's do this:

1. Decide on the quote that you like. When you have it decided, you will need to cut this out of your text felt. You can do this a couple of different ways: print off the text that you like, cut it out and use those letters as stencils; you can free hand what you want the text to look like; or you can use a projector to project the text onto the felt (this is what I did). You will also want to cut a thin slice of felt that is slightly longer that the width of your background felt.

2.) Take your background felt and fold two corners in until they meet. You will cut off these two corners. You should be cutting off the two triangles that are made while folding the corners in. Your leftover background felt will leave a point.

2.) Take your background felt and fold two corners in until they meet. You will cut off these two corners. You should be cutting off the two triangles that are made while folding the corners in. Your leftover background felt will leave a point.
3.) Next you will mark where your plan to put the stick on the back of the felt. In order to plan this, you will need to look towards the top and fold the fabric over the top of the stick with room for gluing it down. This will show where you will lay the stick, mark the bottom of where the stick lay.

4.) Cut little slits along the line that you just drew. These should be every so often and be as long as the width of the felt strip that you cut from the text felt. It will vary in the look you want, but I did one slit about every 1/2 inch.

5.) Weave the strip of text felt through the slits that you cut through the background felt.
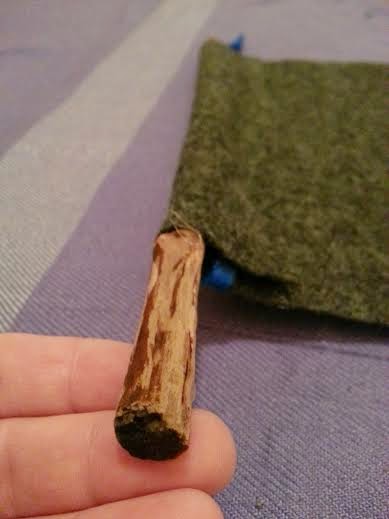
6.) Place the stick against the line that you drew on the back of the background felt and fold the background felt on top of the stick. Hot glue the stick and fabric together to encapsulate the stick into the fabric.

7.) Using the Tacky Glue, glue the text onto the front of the piece of background felt.If you want the line to be straight, you can use a ruler, but I didn't use one :).

8.) Wrap the string around one side of the stick making sure that it is secure. Take the same string and wrap it around the other side of the stick. You can use some hot glue to keep it from unraveling. Make sure to leave some room, so you can hang it later. However, you should wait a short while before hanging it so all the glue will dry.

9.) Marvel in how awesome you are.
Craft Flaw: I messed up when I originally made this, and I wanted to share what I did to make it better. When I originally wrapped the string around the stick, you could see the hot glue, and it was a hot mess. So, I just went through and re-wrapped each side with the string. This time, I just tied the string to itself instead of using hot glue, and it is staying pretty well.
Now, it is time for you to go make one!
-Autumn
Now, it is time for you to go make one!
-Autumn
Awesome, this has inspired me to make a sign for Adam's room, maybe something having to do with boy scouts. I'm not sure yet. Better yet, he could do it too!
ReplyDeleteOhhhh, I like it. Please show me pictures when you are done.
Delete